Homeowner and Pro Help
We highly recommend that homeowners arrange for professional installation to make sure that your window or door investment fits and functions the way you imagined. A Harvey distribution partner may be able to connect you with installers in your area.
If you run into any unexpected situations in your replacement project, our professionals at Harvey are here to support you with the right expertise to help you finish the job.
Frequently Asked Questions
Cleaning the Glass
A simple soap solution with clean water and mild detergent, or a standard commercial household glass cleaning product, should be applied to a grit free cloth or sponge to gently clean glass surfaces. It is recommended to remove any excess cleaning solution with clean water, and use a squeegee or lint free dry cloth to remove any excess water from the glass.CAUTION:
- Do not use rust removal products, abrasive cleaning agents with cerium oxide (such as Soft Scrub®), razor blades, sandpaper, or other sharp instruments on glass surfaces.
- If using a squeegee, be sure it is free of any debris which could scratch the glass surface during use.
- Be careful not to damage glazing or insulating unit seals by overgenerous application of cleaners.
- If using standard glass cleaning products, be sure to follow manufacturer’s directions on label for proper handling and warnings.
Cleaning the Wood or Vinyl Frame
We suggest the same cleaning methods above to clean the wood or vinyl frame of your windows. However, if you decide to use other products please consider the following warnings.CAUTION:
- If any cleaner or solvent is used on the vinyl or wood frame around the glass, care should be taken to avoid overspray onto the glass. If overspray does occur, it should be wiped off immediately.
- The use of sandpaper, razor blades, steel wool, emery paper, or products with cerium oxide will leave fine scratches on the vinyl or wood surface and could be damaging. To avoid damage, sample test an inconspicuous area of the frame with the cleaning solution and method of your choice.
- Be sure to follow manufacturer’s directions on label for proper handling and warnings for any products you use .
Cleaning the Door Surface
Routine cleaning helps maintain the appearance and extends the life of your entry door's painted finish. Use a soft microfiber cloth or sponge with mild, soapy water to gently clean the surface. Avoid any harsh or abrasive cleaners that may damage the finish. Harvey Entry Doors use waterborne paint finishes, do not use ammoniated or solvent based products, as they may react with the paint finish.Always test any cleaning solution in an inconspicuous area first to ensure it does not harm the surface.
For deeper cleaning needs, a detergent-based cleaner such as a TSP Substitute may be used. Be sure to follow all safety guidelines, including wearing appropriate protective gear, and never mix these cleaners with other chemicals.A simple soap solution with clean water and mild detergent, or a standard commercial household glass cleaning product, should be applied to a grit free cloth or sponge to gently clean glass surfaces. It is recommended to remove any excess cleaning solution with clean water, and use a squeegee or lint free dry cloth to remove any excess water from the glass.
CAUTION:
- Do not use abrasive cleaners, pads, or brushes that may scratch or dull the surface.
- Avoid products that contain ammonia when cleaning waterborne painted surfaces.
- Do not power wash the door, as excessive pressure can damage paint and seals.
Blinds Between Glass stay dust-free, are safe for children and pets, and are easy to care for and operate. This video shows you how to care for your Blinds Between Glass and how to use them for optimal convenience and enjoyment.
- Blinds Between Glass raise and lower with the use of magnets inside the glass and on the external operator. Occasionally, the operator can come loose from the internal magnets, causing the blind to not operate properly.
- Although Blinds Between Glass never require dusting, the glass itself must be kept clean to ensure easy operation. If operating your blind is taking more force than usual, you might need to clean the glass.
- If your Blinds Between Glass have been in a raised position for a long time, the blinds might now lower properly when first lowered. “Exercising” the blinds will correct this issue.
- Occasionally when operating Blinds Between Glass, the blind might become out-of-level, with one side of the blind being higher than the other.
If you need to replace the pivot bar, our parts page for instructions. If you need other replacement parts, please call Field Service at 1-800-822-0437, or fill out our parts request form. Please be prepared to provide us with the following product information:
- Order Number
- Product Type
- Date the Product was Installed
- Description of the Defect
When installing an air conditioner in your window opening, you cannot rest the air conditioner directly on the window sill.
We suggest you put a 2 x 4 into the sill track that measures 1″ or 2″ higher than the sill so the air conditioner can rest on it, or ask your contractor to use our A/C Sill Adaptor.
Double hung windows come with jamb adjustments on the inside center of each jamb. These can be adjusted in or out as needed to make sure the sash reveals remain consistent.

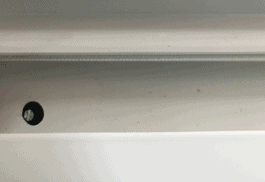
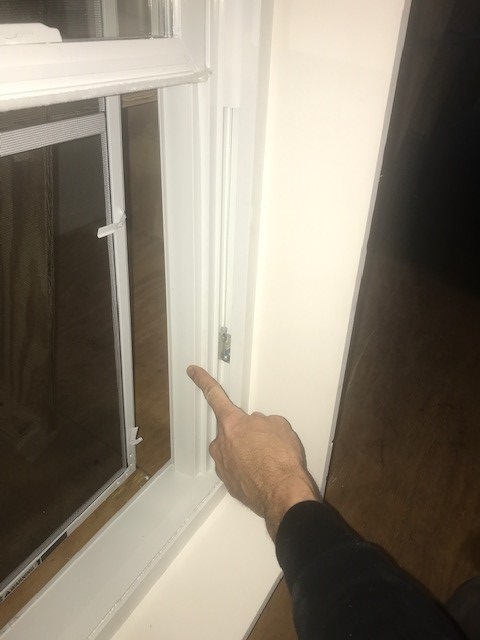
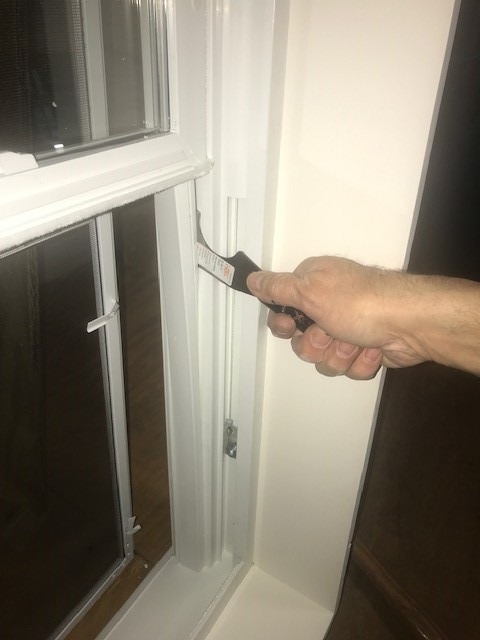
Follow these steps to remove the top sash stop
Step 1
Raise bottom sash 6"

Step 2
Tilt sash to 90° angle and remove sash

Step 3
Stiff putty knife can be used to remove sash stop


Step 4
Stop removed

NOTICE: Your replacement Harvey Building Products double hung sash may have been supplied to you with either no locking hardware or locking hardware that is newer and visually different from that supplied with the original window. If so, it will be necessary to remove the locking hardware from the original sash and install it on the new replacement sash. Below are the general steps for this simple procedure.


IMPORTANT: To avoid damaging the screws or the windows, use only a hand screwdriver for removing and installing all screws. Do not over tighten screws.
- Rotate the lock handle to the right to disengage the LOCK from the KEEPER on the original sashes.
- Using a hand screwdriver, remove the screws from the LOCK (in the case of a replacement bottom sash) or the KEEPER (in the case of a replacement top sash) from the original sash. In some cases, a small (#1) screw bit will be required to remove the KEEPER screws. (NOTE: Take care not to mix up the screws from the LOCK and KEEPER, as they are not identical and they will be used to reattach the hardware to the replacement sash.)
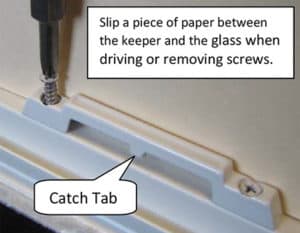
- If a visually different version of the locking hardware was supplied on the replacement sash, remove it using the same procedure outlined above. Slide a piece of paper between the KEEPER and the glass of the replacement top sash to prevent damage to the glass when removing the KEEPER screws.
KEEPER installation on replacement top sash:

Line up the holes of the KEEPER with the pre-drilled holes in the replacement top sash. Be certain to orient the KEEPER so that the catch tab is facing away from the glass as shown in the picture. Slip a piece of paper between the back of the KEEPER and the glass to protect the glass of the new sash from damage, and secure the KEEPER with the screws removed in Step 2. Do NOT over tighten the screws. (Remove the paper when both screws are fully seated.)
LOCK installation on replacement bottom sash:
Line up the holes of the LOCK with the pre-drilled holes in the replacement bottom sash. Secure the LOCK with the screws removed from the original sash in Step 2. The screws will drive with some resistance as they penetrate the aluminum reinforcement inside the sash rail. Fully seat the screws but do not over tighten.
When replacing a window into an existing frame that is not perfectly square, “on the fly” adjustments are often needed to ensure a good installation that guards against air and water infiltration while also keeping the window
easy-to-operate. That’s why Harvey windows include several built-in features and tools to assist in the perfect installation.
Rolling windows come with the built-in feature of removable rollers, that when placed correctly
can help level the sash to the frame.

Casement windows come with an adjustable hinge assembly, which, when using a Harvey casement wrench, allows you to pull the top, bottom or both areas of the sash toward or away from the frame. Casement wrenches can be ordered by emailing Customer Service.

Staining:
- Apply one to two coats of stain (wiping the sash after each application).
- Apply two coats of polyurethane and sand with fine steel wool after drying.
Painting:
- Apply one coat of primer.
- Apply one to two coats of paint.
* Warranty: All exposed wood must be properly sealed within 48 hours upon installation. Harvey will not be responsible for water staining, discoloration, etc. resulting from condensation or moisture that takes place before units are finished on the interior.
Please visit our Parts catalog page and we’ll guide you through finding the right part for your Harvey product.
There are a few reasons why your window may not close completely or if your sash doesn’t operate correctly. Please check your window for the following.
Double Hung Windows
- Make sure that the pivot bar (cast metal at the bottom of sash) is seated in the metal housing (cam) on the side of the track. If it is not, it must be reinserted. Watch our How-to video on operating and cleaning your Harvey double hung window for easy to follow instructions.
- Check to see if any of the two pieces of metal (pivot bar) described above have broken, leaving fragments in the bottom of the track. If your pivot bar is broken, you may order a replacement part.
- Check to see if any part of the vinyl on the sash or in the track has been cracked or sustained damage.
Casement Windows
- We recommend that you clean and lubricate the hinges of your casement windows at least twice a year. If you haven’t lubricated the mechanical portion (crank mechanism & hinges), please do so with a light oil.
- Check the operating arms to see if they have become bent or unfastened from the unit or sash itself.
- Check to see if the window sash lock keeper comes in contact with the lock itself.
If you have checked your window for all of the above circumstances and it still does not close or operate correctly, please submit a warranty claim. Please be prepared to provide us with the following product information that can be found on your warranty label:
- Order Number
- Product Type
- Manufacture Date
- License Number
In some cases, moist air can fill the space between the panes of glass when the seals along the outer perimeter of glass fail. This is called “seal failure”. Seal failures allow moisture to penetrate into the space between the panes of glass making your insulated unit appear cloudy or fogged. If there is moisture on your window glass that can be wiped away, that is condensation and not a seal failure.
Depending on your product and its related warranty, Harvey provides coverage to the original purchaser for the repair or replacement of failed insulating glass units for the specific duration outlined in the product warranty. If you do not have the original warranty document from your installer, you can find it on our warranty information page.
To provide you with the most timely solution, we ask that you first contact your contractor who did the installation. Explain or describe the problem to them, and they can arrange for an inspection to determine responsibility and order any replacement insulating glass units that may be needed.
If after a reasonable time, you have not had an inspection or your problem resolved, please contact us. In order for us to expedite your claim, please provide us with the following product information found on your warranty label:
- Order Number
- Product Type
- Date the Product was Installed
- Description of the Defect
While the reason for a small amount of water build-up in a patio door’s sill track could be a result of a faulty installation, it is not necessarily due to product failure.
You may be experiencing what is known as "controlled water", which means the water should eventually work its way out through the dust pad at the center of the sill or dissipate over time. You may notice this occurs after harsher weather events.
As long as the water does not breach over the edge of the sill into the home, it is considered "controlled water", and not a problem with the door.
Thermal deflection is a rare, natural phenomenon that can occur when sunlight reflects off of a surface with enough heat to distort siding or other materials. The damage can be to one’s own residence, or to a nearby home.
How does it happen?
A combination of various factors needs to be in place for the thermal deflection phenomenon to occur, including some or all of the following:
- Certain times of year and sunlight angles
- Close proximity of home exterior walls
- Structure design
- Surfaces such as window glass, roof shingles, asphalt or swimming pools that could reflect sunlight
- Heat radiating from nearby surfaces such as driveways, air conditioning compressors and barbeque grills
- Lack of trees and shrubs, fences and cloud cover to divert sunlight
Are the products involved in thermal deflection defective or were they improperly installed?
No, a thermal deflection incident does not necessarily indicate that product performance or installation were improper. The natural phenomenon instead indicates the presence of some or all of the above factors.
What can I do to avoid, or stop, thermal deflection?
Unfortunately, it is difficult or even impossible to predict if thermal deflection is going to occur in any particular situation. Nevertheless, to minimize your risk you can:
- Use full screens in your windows
- Use trees and shrubs to block or diffuse the sun’s rays
What do I do if it happens?
The homeowner should contact their insurance company, and see if it is covered by their policy.
For more detail, you can refer to the study sponsored by the U.S. government and conducted by Ernest Orlando Lawrence Berkeley National Laboratory or the research by Cardinal IG (glass manufacturer).
Harvey gives you the flexibility to choose the performance package that fits your project with several glass options that meet ENERGY STAR® requirements as well as additional energy efficient packages. Ask your Harvey sales representative or contractor about a particular window and its qualifications for meeting ENERGY STAR requirements.
Many installers throughout the Northeast are familier with Harvey, and professionals can purchase products through any of our many distributor locations.
Harvey no longer operates their own showrooms. Please connect with a distributor near you to learn if they have showrooms for homeowners.
Please visit our distributor locator to find a store near you. Harvey products are sold through hundreds of lumberyards and building supply stores through the Northeast US and are produced in our facilities in New Hampshire and Massachusetts
Our Service Area

Homeowners should work with a pro to get Harvey products installed. Professionals can reference our installation page.
